
A Guide to Customizing the Mouse Clicker
Mouse Clicker is a useful software that allows you to automate mouse clicks. Thanks to this tool, you can significantly reduce the time spent on repetitive actions and simplify your work at the computer. In this article, we will tell you how to properly configure Mouse Clicker and give you useful tips on how to use it.
The first step in customizing Mouse Clicker is to install it. Visit the developer's official website or other reliable resources to download the program. Make sure you download a version that is compatible with your operating system.
After installing Mouse Clicker, open the program and familiarize yourself with the interface. It can usually be divided into several main tabs or sections where you can customize the settings to your liking. In each section, find instructions on how to configure the specific actions you want to automate.
It's important to remember that properly configuring Mouse Clicker requires some knowledge and skill. If necessary, refer to the documentation or find online tutorials to better understand the program's functionality.
Before you begin configuring Mouse Clicker
Before you start setting up your mouse click program, you need to make sure that you have all the necessary components and software.
- Check that your computer mouse is connected and functioning correctly. The program will use your mouse to simulate clicks.
- Make sure you have a mouse click software tool installed on your computer. If you do not have such a program, you can download it from a reliable source on the Internet. Note to choose a version of the program that is compatible with your computer's operating system.
- Familiarize yourself with the program documentation. This will help you understand how to set up and use the mouse clicker functions.
- It is recommended that you back up all important files and data on your computer before you start customization. Despite the reliability of the program, unforeseen situations can always arise, and a previously created backup will help to restore the system in case of failure.
- Make sure you know how to use the key combination to disable the mouse clicker program when necessary. This will help you to quickly stop the automatic mouse clicker in case of a malfunction or error.
Steps to set up Mouse Clicker
Step 1: First, you need to download and install the Mouse Clicker program on your computer. You can easily find such an application on the Internet. After successful installation, proceed to launch the program.
Step 2: If you are looking for a way to customize the program, you can find the "Settings" or "Options" button in the main menu. Just click on this button and the settings window will automatically open in front of you.
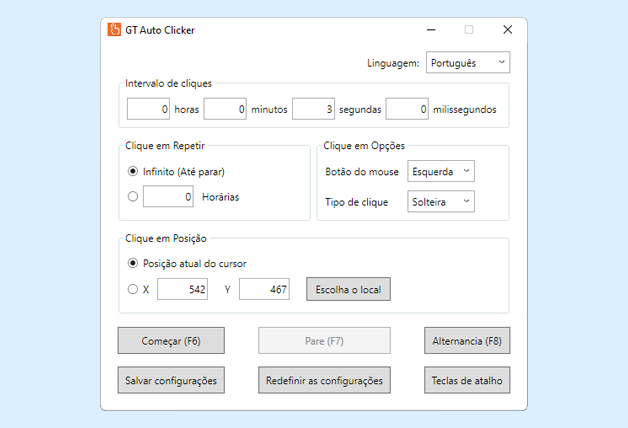
Step 3: If you go to the Settings section, you will notice the settings related to mouse actions. Here you will be able to define the click frequency, cursor position, click type and other parameters. Study these options carefully and choose the settings according to your needs and preferences.
Step 4: Some programs have an option to save the settings to avoid having to re-configure them in the future.
Step 5: When the application settings are finished, return to the main program window and start using the automatic mouse clicker. Place the cursor at the desired position on the screen and activate the corresponding mouse button click, which will be performed according to the pre-defined settings.
Step 6: Checking the functionality of the settings is an important step to make sure they are working properly. Open the selected application or web page and test how Mouse Clicker clicks on various interface elements. If necessary, re-configure or make changes.
Step 7: Congratulations on successfully setting up Mouse Clicker! Now you can use it to automate a variety of tasks.
Selecting the right settings for Mouse Clicker
The first step is to determine the type of clicks required. Mouse clickers can perform single or multiple clicks, as well as long clicks. Determine what types of clicks are required for your work or game.
Then set the interval between clicks. Depending on your needs, you may require either the fastest possible clicker or a delayed clicker. It depends on the specific task you are facing. Check your requirements and adjust the interval accordingly.
In addition, do not forget to set the click accuracy. If necessary, you can set the click zone so that the program is activated only when you click in a certain area of the screen. This can be useful if you want to limit the click area or avoid unwanted actions.
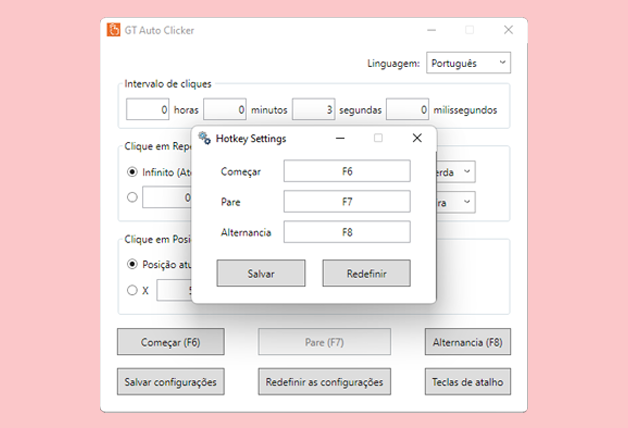
Finally, note the ability to customize key combinations to activate and deactivate mouse clicker. Choose convenient and unused keys that are easy to memorize and use. This will help you quickly turn the program on and off when needed.
Properly configuring mouse clicker will allow you to automate many actions and save time. Using these tips, you will be able to customize the program according to your needs and make your work more efficient.
Tips for optimal use of Mouse Clicker
- To automate repetitive tasks, such as mouse clicks at specific intervals, it is recommended to use mouse clicker.
- Before using this program, you should be aware of all its functions and features. It is recommended to read the manual or watch video tutorials.
- You should also check if mouse clicker is compatible with your operating system and the programs you plan to work with.
- Before using mouse clicker, it is recommended to save all relevant files and close all unnecessary programs or windows.
- Find the best settings based on your tasks, determine the number of clicks, intervals and mouse click points.
- Keep your attention and avoid mistakes when customizing mouse clicker. A few wrong clicks or settings can lead to undesirable consequences.
- Before performing tasks on large amounts of data or important operations, it is recommended to test the mouse clicker on a small area.
- To avoid system overload or performance problems, it is recommended to pause mouse clicker from time to time.
- Don't forget to update mouse clicker and keep an eye on new versions of the program to get all the latest fixes and features.
- If you have problems using mouse clicker, please refer to the user manual or contact the program developers for assistance.
Additional Mouse Clicker Features
1. Delay mode
With an auto-click program, you can control the delay between clicks. This is especially useful if you need to mimic natural user behavior and avoid quick button clicks. You can set the delay in milliseconds so that the clicks occur at a certain interval.
2. Click area restrictions
Some auto-click programs also offer the option of limiting the click area. You can specify the coordinates of the upper left and lower right corners of the working area within which clicks will be made. This is especially useful if you need to focus on a specific area of the screen, for example, when automating game play.
3. Custom commands
Some auto-click programs also allow you to create custom commands. This allows you to automate complex sequences of clicks and mouse movements. You can create scripts that will run in a specific order and repeat the desired number of times.
4. Hotkeys
In addition, some auto-click programs allow you to set up hotkeys to control the program. You can assign specific keys for starting and stopping automated processes, as well as for other commands. This greatly simplifies the use of the application and provides more convenient control.
Mouse Clicker, thanks to its additional features, becomes an even more versatile and flexible tool for automating mouse clicks. Depending on your needs, you can customize and use these features to achieve the results you want.